
Now that I've got a digital camera, expect to see vast improvements to this section. I plan to document every step of my current project, Salvo, with a few other examples thrown in. Now you needn't be making your own "Scale Model Joe" to make use of these techniques. Many of them, especially the painting tips, can be used on traditional customs. Try incorporating drybrushing into your next custom project, or at least file off the mould seams. Avoid jumping into the deep end, and you could work your way up towards some fantastic creations. Again, if you have any further questions or comments, I welcome email at McGhiever@yahoo.com.
Ultimately I learned all my techniques from scale modeling resources, and in my opinion I'm still at the beginner level. I would strongly recommend Building and Painting Scale Figures by Sheperd Paine, which was published by FineScale Modeler Magazine. Unfortunately it's out of print, although library or used copies shouldn't be too hard to come by. However I own a different book by the same author, which has all the same basic information condensed into one chapter, plus a lot of really cool other stuff. That book is:
 | My first recommendation, no matter what sort of custom you're doing, is to sand or file off the mould seams and the copyright embossing on the thigh and butt. As long as you're painting those areas, you might as well do this, and the figure will look twice as good. Any sandpaper or metal file should do the job. Finish off with a high-grit sandpaper and the sanded areas should be as smooth as the rest of the parts. |
 If you can pose the figure to your satisfaction already, go ahead and skip down to the paragraphs on filling in the joints. For more elaborate poses, it can be necessary to make cuts with a hobby saw and reposition ankles, hips, etc. This was done extensively with Firefly and also to Snow Serpent's neck and ankles. For joints that will be only slightly opened, one simple cut will do, as you can see here on Salvo's ankle. For greater angles, though, such as at Salvo's toes, it is necessary to make a notch on the other side as well or he'll have an abnormally long foot. Once the cuts have been made, hold the body part over a candle until the plastic gets soft enough to bend gently. Don't let it melt! That's really hard to fix. As soon as you have the joint positioned to your liking, dunk the piece in water to cool it in shape.
| Flexing the knee is even easier. Here you can see the wedge I've cut out. When the leg is reassembled and bent, it will make an acute angle instead of bending at exactly 90 degrees. This is crucial in making a realistic kneeling pose. |  |
 | Once any neccessary modifications have been made, you are ready to fill in joints, holes, and whatever else. Your main tool will be contour putty, which is usually next to the glue at any hobby shop. It's basically a goo you squeeze out of the tube onto whatever you want to fill. Then you wait a day or two for it to dry completely, then you can sand it into the right shape. Filling in holes is pretty easy. For knees and waist this will involve filing a few folds of the clothing. Don't be intimidated; that's actually easier than filing it perfectly smooth. |  |
 This product is in the plumbing department of any hardware store. You mix the two parts of the epoxy together to get a claylike consistency, which can then be sculpted while it's still malleable. I wish I could fill all joints with this stuff, but it dries as hard as metal, so it's harder to sand, and it doesn't form a smooth seam with the plastic like contour putty does. However in situations like this, where you need to sculpt detail rather than file it, epoxy putty is essential.
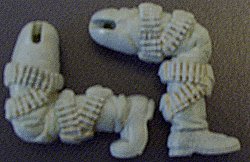 | When I think the joint looks good, I spray the area with primer, which reveals that, no, there are still plenty of holes and irregularities that need filling in. So I add more putty, wait for it to dry, sand it, prime again, and so on back and forth until I get anxious to move on and say "Good enough!" This is the most time-consuming portion of the process, and in all honesty probably the least fun. However you will definitely regret not devoting the proper amount of time to it. |  |
 | The rest of the joints are filled in the same way. The toughest is the waist, simply because you're filling in the most space, and it's important to sculpt some realistic folds. Don't be too dismayed by less-than-stellar results; you'll get better with each figure. I've even advanced to the point where I'm filling in the shoulders as well. Depending on the position of the arms it may be necessary to do this after painting everything else. |  |
The crucial realisation you must have about figure painting is that, while the figures are very small, the light source illuminating them is still life size. To create the illusion of normal size, you have to paint in the shadows and highlights on the figure's clothing and skin. Turn away from your computer a minute and look out the window or down the hall or whatever at someone a fair distance from you (be discreet, though, if you don't know them well). You'll notice those shadows and highlights are quite distinct even from far away.
First of all, I spray my figures with primer first, giving everything an even colour (grey for most projects, white for mostly light-coloured figures like Snow Serpent and Toxo-Viper). Then I do a basecoat for every large section of the figure (jacket, pants, etc). If you're using enamel paints, like I have been, you'll have to stop at this point and let the basecoat cure for a few days. This is the primary reason my figures take so smegging long, and has induced me to begin converting to water-based acrylic paints, which cure in under an hour.
Once things have safely cured, mix up a much darker version of your base colour and thin it a bit with water (for acrylics) or paint thinner (for enamels). For the best effect you have to paint each shadow in individually. Don't paint the back of each fold, but rather the underside (look at your own clothes to see the difference). After you've done an area, clean your brush and then wet it down with water/thinner and dab around the edges of each shadow to blend the darker colour into the surrounding basecoat without leaving a distinct edge. This can be tricky and frustrating the first few times, but once you get a handle on it you'll be extremely pleased.

Theoretically highlights should be painted the same way: individually and then blended. However painting the shadows was tedious enough, and enamel users will have to wait days for the shadow paint to cure, so I fudge a bit here and simply drybrush the highlights. To do this, mix up a much lighter version of your base colour on an index card and then let it sit a minute. The paper with soak up most of the water/oil leaving just the pigment behind. Get some of the pigment on a brush with short, stiff bristles and then dab it on the paper until no more paint seems to be coming off. Now gently scrub the brush over the areas you want to highlight; the paint will rub off on the raised details.
Not only does this technique suffice for highlighting clothing, but a silver-black mix over weapons does wonders. Drybrushing a completely different colour can also be essential for other detailed areas:


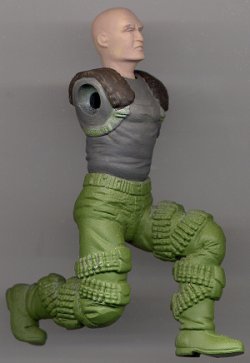
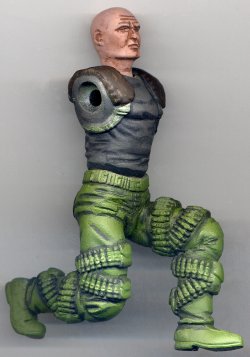
Finally, to take clothing to the next level, I do two more things. First I mix an extremely dark (but never just straight black) version of the basecoat and outline seams, collars, backpack straps, fingers, and such. This is really a crucial step because it gives the impression of sharp overhangs that G.I. Joe figures, while impressively moulded for toys, simply don't have. Secondly I mix an extreme highlight and drybrush edges of collars, sleeves, gun barrels, etc. In the image below, the torso and arms have been fully shadowed and highlit while the waist and legs still have just the basecoat:

I hope this section has clarified some of my techniques. Once again, when I have my own digital camera I will illustrate this section much more fully. I am always happy to give more advice/clarification/encouragement if you email me at McGhiever@yahoo.com. Everything I've learned about figure modelling and painting is from hobby books, magazines, and websites. There's plenty of information out there, and although none of it applies specifically to G.I. Joes, the techniques are the same. Finally, keep trying; you'll improve with every piece. I repainted Desert Storm's backpack just one year after my first attempt, and just look at the difference:
